Reports and exporting information in CiviCRM - User Guide
1. Reports VS Search- which is most suitable for your requirements?
1.1 Reports
Reports allows users to easily view complex data. This is particularly useful when users require the same or similar information repeatedly. This information can be made available in various ways:
- Email report- a user can schedule a report to regularly be sent to the user by email.
- Export- Reports can be viewed in the browser, or a PDF or CSV export can be generated.
- Dashlet- A report can be added and therefore viewed on the dashboard, allowing useful information to be updated and viewed each time the dashboard is loaded.
Reports can be flexible in comparison to searches, for instance a report allows a user to change the columns displayed.
1.2 Advanced search
Advanced search provides more ways to get the information you’re searching for. If you want to perform an action against a result, it is better to use the search function. Results from this can also be exported. The search function does however have limitations, for instance, you can’t group results by a particular criteria, summarise, or easily produce graphs of results.
2. Using the Reports function
CiviCRM, has a wide variety of reporting features which allow you to easily customize existing reports or create new reports. Report templates are general reports that are available to customise further. These can be found through the Reports menu, clicking Reports > Create report from templates page. This gives a list of the pre-built reports.
Please note that if you do not have the option to create a new report, you may not have permission to do so on your account. This can be added by a site administrator or a member of the GMCVO Databases team.
Clicking on the report allows it to be configured. Some useful terms for configuring reports to specific user needs are:
Report criteria- this allows you to decide what information will be displayed.
Display columns- these checkboxes allow you to choose what data you want to be present in your report by selecting relevant fields.
Group by columns- this is useful when creating a report which summarises data, so that different types can be analysed.
Filters- Filters are the primary way to specify what records you want to include in your report.
Data range filter- This allows data to be selected from a certain period of time, such as in the “This year”, “Previous quarter”, or within a range of dates for instance “1st April 2012” to “1st Oct 2013”.
Once you are happy with your report you can save it so that it will be available to use again.
Additional tips
- Users can set up permissions to limit who can view different reports
- If you want to receive the report via email on a regular basis, fill in the subject and To and From fields.
- If you want your report to be available on your dashboard, select the Available for Dashboard? Box, and this will be visible to all users with the relevant permissions to do so.
3. Using the Search function
An advanced search allows you to search across contact data, through specifying two or more categories of information.
The advanced search is found through the navigation menu, Search > Find Contacts > Advanced Search.
A default Advanced Search returns Contact records, however this can be changed by simply selecting the record type you need from the Display Results As dropdown in the upper right hand corner.
Different criteria can also be combined. Once you select two categories for instance “Event attendees” and “Manchester” the search will return event attendees from Manchester only. This can be changed to show either event attendees or individuals from Manchester using the Search Operator drop down and changing from AND to OR.
4. Exporting data
4.1 Exporting from reports
Once you have gathered your data through the reporting function you may want to export the information either as a csv file that you can work on, or as a pdf. This is done by clicking on the PDF or Export to CSV options in the top left hand corner above your report.


Once this has been selected the file will automatically download, allowing you to save the file.
4.2 Exporting from an advanced search
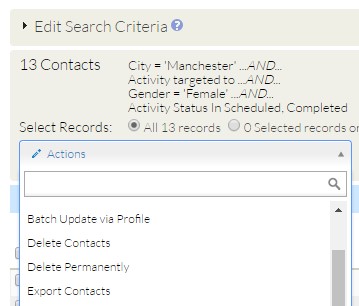
To export from an advanced search, click All records by the Select Records option. The dropdown gives various useful actions to carry out on the data[1] including add to group, mailing labels or send email.


Selecting Export Contacts takes you to new screen which allows you to customise the information being exported. Export PRIMARY fields downloads all primary criteria, however clicking select fields for export and continue allows the user to define exactly which fields are required for download. Once this has been completed field mapping can be saved which remembers the criteria and allows you to use this at a later date, then click export to download your CSV file.
Once you have created your reports or searched and exported data, you can manage and analyse the information in the way you require and use it in various ways such as to inform stakeholders, report to funders or track service delivery.
[1] This will vary depending on the nature of the information held.

